How to Build CI/CD Pipeline for Continuous Training with SageMaker
- Nikitha Narendra
- 10 min read
- 3 years ago

Training models is a time-consuming task, often requiring multiple iterations. While building the algorithms is challenging on its own, setting up the training process requires further understanding of MLOps which is out of scope for data scientists.
To mitigate these challenges, using Continuous Integration and Continuous Deployment (CI/CD) methodologies for machine learning can be a game-changer. Building pipelines is a one-off task, which ML practitioners can later use to train and deploy their models without any help from the MLOps team.
By using AWS SageMaker for customizable pipeline solutions triggered by code base modifications and DagsHub for data and code management and experiment tracking - building and managing those pipelines becomes a manageable task.
In this tutorial, we’ll use the Kvasir Image Segmentation project to build and automate a custom pipeline that trains an image-segmentation model that can detect diseases in the gastrointestinal tract
What will this blog cover?
In this tutorial, we’re going to work with the Kvasir segmentation dataset - a Multi-Class Image Dataset for Computer-Aided Gastrointestinal Disease Detection and Segmentation. The data folder contains 2 subfolders:
- images - original GI tract scans
- masks - negative masks of the diseases located in the respective scan.
The goal of the project is to build a custom two-stage pipeline that automates the data processing and training process. We will first create a simple image-segmentation model to automate.
We'll go through the process of creating a custom training automation pipeline with SageMaker, including:
- Environment Configuration: Establish the environment with the required permissions tailored to our project's needs.
- Workflow Construction: Our pipeline will consist of a multi-stage workflow, with at least two distinct stages for efficient processing.
- Automated Pipeline: We'll automate the pipeline's execution using dedicated build scripts.
- Model Registration: As a final step, we'll ensure the trained model gets registered appropriately for deployment.
How to setup SageMaker for Continuous Training?
Project Setup
Projects require a certain structure of files so that they can be sequentially executed by CodePipeline. I’ve created a blog on how to Setup SageMaker for Machine Learning CI/CD pipelines that explains in detail everything you’ll need to set up before starting the training process.
How to set up MLflow to log the experiments and trained model?
DagsHub provides a free and fully integrated remote MLflow server with every repository, where you can log and monitor your experiments and trained models. You can find the MLflow configurations of your repository under the remote button of the repo.
If you look at the train_tf.py file, you’ll see some MLFlow environment variables set up.
os.environ['MLFLOW_TRACKING_USERNAME'] = DAGSHUB_USER_NAME
os.environ['MLFLOW_TRACKING_PASSWORD'] = DAGSHUB_TOKEN

import mlflow
This is to set up the connection to the MLFlow server associated with our repo and provide it with writing access using the user name and token. This allows us to use functions such as mlflow.log_params, mlflow.log_metrics, and mlflow.<framework>.log_model to log things to MLflow.
#create an experiment
experiment_id = get_experiment_id('kvasir-segmentation')
with mlflow.start_run(experiment_id=experiment_id):

		# log parameters
    mlflow.log_params(args.__dict__)

		# log metrics
    mlflow.log_metrics({
        "train_loss": avg_losses[0],
        "validation_loss": avg_losses[1],
    })

		# log model
		mlflow.tensorflow.log_model(
       model= modelUNet,
       artifact_path='model',
       registered_model_name=args.registered_model_name,
    )
In fact, one of the amazing functions that MLFlow offers is mlflow.<framework>.autolog. This function automatically logs the working environment - parameters, artifacts, models etc. - to MLflow.
# Since we're working with TensorFlow
mlflow.tensorflow.autolog(log_models=True)
To control the dependencies that get logged use the conda_env parameter. The last part of the script does exactly this:
mlflow.tensorflow.log_model(
       model= modelUNet,
       artifact_path='model',
       registered_model_name=args.registered_model_name,
			# modify this parameter
       conda_env= {
            "name": "mlflow-env",
            "channels": ["conda-forge"],
            "dependencies": [
                  "python=3.10.10",
                   {
                     "pip": [
                             "mlflow==2.5.0",
                             "tensorflow==2.12.0",
                            ],
                        },
                    ],
                }
            )
How to create a Pipeline using AWS SageMaker and CodePipeline?
Every pipeline contains a script that defines the order of executions and contains configuration for the required resources, parameters, and execution files. In our project, you will find the pipeline script in your project subfolder under pipelines labeled pipeline.py.
A basic pipeline script requires the following to be setup:
- Create a session - Using the region and your bucket, create a SageMaker session
boto_session = boto3.Session(region_name=region)

sagemaker_client = boto_session.client("sagemaker")
runtime_client = boto_session.client("sagemaker-runtime")
sagemaker_session = sagemaker.session.Session(
      boto_session=boto_session,
      sagemaker_client=sagemaker_client,
      sagemaker_runtime_client=runtime_client,
      default_bucket=default_bucket,
)
return sagemaker_session
2. Assign a role - A detailed explanation of how to setup an IAM role customized for our training purpose is available in the Setup SageMaker for Machine Learning CI/CD pipelines blog.
3. Set up the project parameters - If you take a look at our train_tf.py file, you will see a function named parse_args() that contains a list of parameters.
# Dagshub Configurations
parser.add_argument("--dagshub_token", type=str)
parser.add_argument("--dagshub_user", type=str)
parser.add_argument("--dagshub_repo", type=str)

# Experiment Details
parser.add_argument("--experiment_name", type=str, default='kvasir-segmentation')
parser.add_argument("--registered_model_name", type=str)

# Hyperparameters
parser.add_argument('--epochs', type=int, default=100)
parser.add_argument('--batch_size', type=int, default=8)


# data directories
parser.add_argument('--train', type=str, default=os.environ.get('SM_CHANNEL_TRAIN'))

# model directory: We will use the default set by SageMaker, /opt/ml/model
parser.add_argument('--model_dir', type=str, default=os.environ.get('SM_MODEL_DIR'))# Define DagsHub UserName
dagshub_user = ParameterString(
name="DagsHubUserName",
default_value="Nikitha-Narendra"
)
# Define DagsHub Repository
dagshub_repo = ParameterString(
name="DagsHubRepo",
default_value="Kvasir-Image-Segmentation-Training"
)
# Define Experiment Name
experiment_name = ParameterString(
name="ExperimentName",
default_value="kvasir-segmentation",
)
# Define name of the Registered Model
registered_model_name = ParameterString(
name='RegisteredModelName',
default_value='kvasir-segmentation',
)4. Set up the pipeline parameters - Another set of parameters that should be set up are resource parameters. These parameters dictate the allocation of hardware resources to various stages of the pipeline.
# Data prep
processing_instance_type = ParameterString(
		# instance type for data preparation
        name="ProcessingInstanceType",
        default_value="ml.m5.xlarge"
    )
processing_instance_count = ParameterInteger(
		# number of instances used for data preparation
        name="ProcessingInstanceCount",
        default_value=1
    )

# Training
training_instance_type = ParameterString(
		# instance type for training the model
        name="TrainingInstanceType",
        default_value="ml.g4dn.xlarge"
    )
training_instance_count = ParameterInteger(
		# number of instances used to train your model
        name="TrainingInstanceCount",
        default_value=1
    )


# Dataset input data: S3 path
input_data = ParameterString(
        name="InputData",
        default_value="s3://kvasir-segmentation/kvasir-segmentation/",
    )

# Model Approval State
model_approval_status = ParameterString(
        name="ModelApprovalStatus",
        default_value="PendingManualApproval"
    )

# Model package group name for registering in model registry
model_package_group_name = ParameterString(
        name="ModelPackageGroupName",
        default_value="Kvasir-image-segmentation-model-group"
    )
5. Build the pipeline steps:
Next, we’ll define the different stages of the pipeline. A general way to define a step is to first create a pre-processor that takes care of the resources to allocate and then create a step that contains parameters like the executing code file, location of inputs and outputs, the pre-processor, etc.
Below are the two stages we defined for our pipeline line. Both are available in the pipeline.py file.
5.1 Preprocessing
When we defined the pipeline resource parameters, we defined separate ones for processing and training. Processing in general takes fewer resources.
So let's define the preprocessor for our Processing step. Here we’re using SageMaker’s SKLearnProcessor.
# The preprocessor
    preprocessor = SKLearnProcessor(
        framework_version="0.23-1",
        role=role,
        instance_type=processing_instance_type,
        instance_count=processing_instance_count,
        max_runtime_in_seconds=1200,
    )
For a processing job to be created, the name, execution file, inputs, outputs, and other auxiliary parameters are required.
 # Preprocessing Step
    step_process = ProcessingStep(
        name="KvasirSegmentationPreprocessing",
        code=os.path.join(BASE_DIR, 'preprocessing.py'),
        processor=preprocessor,
        inputs=[
            ProcessingInput(source=input_data, destination='/opt/ml/processing/input')
        ],
        outputs=[
            ProcessingOutput(output_name='train_data', source='/opt/ml/processing/train')
        ],
    )
5.2 Training Step
Similar to the processing step, we’re going to set up Training. The difference is that the training’s preprocessor, along with the resource parameters, also takes the hyperparameters required for tuning the model.
estimator = TensorFlow(source_dir=BASE_DIR,
        entry_point='train_tf.py',
        model_dir=model_dir,
        instance_type=training_instance_type,
        instance_count=training_instance_count,
        hyperparameters=hyperparameters,
        role=role,
        output_path='s3://{}/{}/{}/{}'.format(default_bucket, 'models',
        base_job_prefix, 'training-output'),
        framework_version='2.12',
        py_version='py310',
        script_mode=True
    )
The training step is similar to how we defined the preprocessing step:
 step_train = TrainingStep(
     name="KvasirImageSegmentationTrain",
     estimator=estimator,
     inputs={
        "train": TrainingInput(
                s3_data=step_process.properties.ProcessingOutputConfig.Outputs["train_data"].S3Output.S3Uri,
                content_type='image/jpg',
                s3_data_type='S3Prefix'
        )
     },
    cache_config=cache_config
 )
6. Setup the pipeline flow
Now that we’ve created step_process and step_train let's define the order of our pipeline.
To create the pipeline, we culminate the session we created in the previous steps.
pipeline = Pipeline(
        name=pipeline_name,
	#Defined in step 3 and 4
        parameters=[
            dagshub_user,
            dagshub_repo,
            experiment_name,
            processing_instance_type,
            processing_instance_count,
            training_instance_type,
            training_instance_count,
            training_epochs,
            input_data,
            model_approval_status,
            model_package_group_name
        ],
	# Defined in step 5
        steps=[step_process, step_train],

	# Defined in step 1
        sagemaker_session=sagemaker_session,
    )
And there you have it – our pipeline is now established. To put it to the test, we've embedded commands within this notebook. You can readily execute these commands to manually verify the pipeline's functionality.
How to Automate a SageMaker Training Pipeline
SageMaker Projects are structured such that any modifications pushed to the production (main) branch initiate the execution of the pipeline. This means that when you commit and push your final production code to the main branch of your project, it automatically triggers the pipeline in CodePipeline.
To automate the process effectively, the pipeline relies on a specific order of events and their associated commands. This is where the build script comes into play. This script encompasses all the essential components for constructing and executing the pipeline seamlessly.
For detailed instructions on creating a build or automation script, you can refer to our comprehensive set-up blog, which explains the various phases of the build script.
The steps to execute the pipeline stages are explained in this notebook. We've transferred the commands from the notebook to the run_pipeline.py file within the pipelines folder. Additionally, we created codebuild-buildspec.yml under root to execute the aforementioned file.
Here’s an example of how to execute the run-pipeline file from the build script (from GitHub Actions or such). This comes under the “build phase”.
- run-pipeline --module-name pipelines.kvasir.pipeline \
     --role-arn $SAGEMAKER_PIPELINE_ROLE_ARN \
     --tags "[{\"Key\":\"sagemaker:project-name\", \"Value\":\"${SAGEMAKER_PROJECT_NAME}\"}, {\"Key\":\"sagemaker:project-id\", \"Value\":\"${SAGEMAKER_PROJECT_ID}\"}]" \
     --kwargs "{\"region\":\"${AWS_REGION}\",\"dagshub_token\":\"${DAGSHUB_TOKEN}\",\"role\":\"${SAGEMAKER_PIPELINE_ROLE_ARN}\"}"
You can export the required arguments in the build script or set up the environment variable manually in the CodeBuild project.
Where to View the Pipeline?
CodePipeline is configured, such that any change made to the production(main) branch, automatically triggers the execution of the pipeline. It's recommended to implement any necessary modifications within a dedicated “test” branch and then merge it into the main branch through a pull request (PR). This approach helps prevent the unnecessary utilization of extensive resources.
For monitoring the pipeline's status and reviewing logs:
- Navigate to the "Projects" section within SageMaker Studio (the same location where you initially created the project).
- Choose your Project, which will lead you to a page displaying all associated repositories, pipelines, Experiments, model groups, endpoints, and settings.
- Under the "Pipelines" section, select the pipeline you've recently created.
- In the "Executions" tab, you'll find a list of all instances when the pipeline was executed, along with their current statuses.
- Select the run whose status or logs you’d like to see.
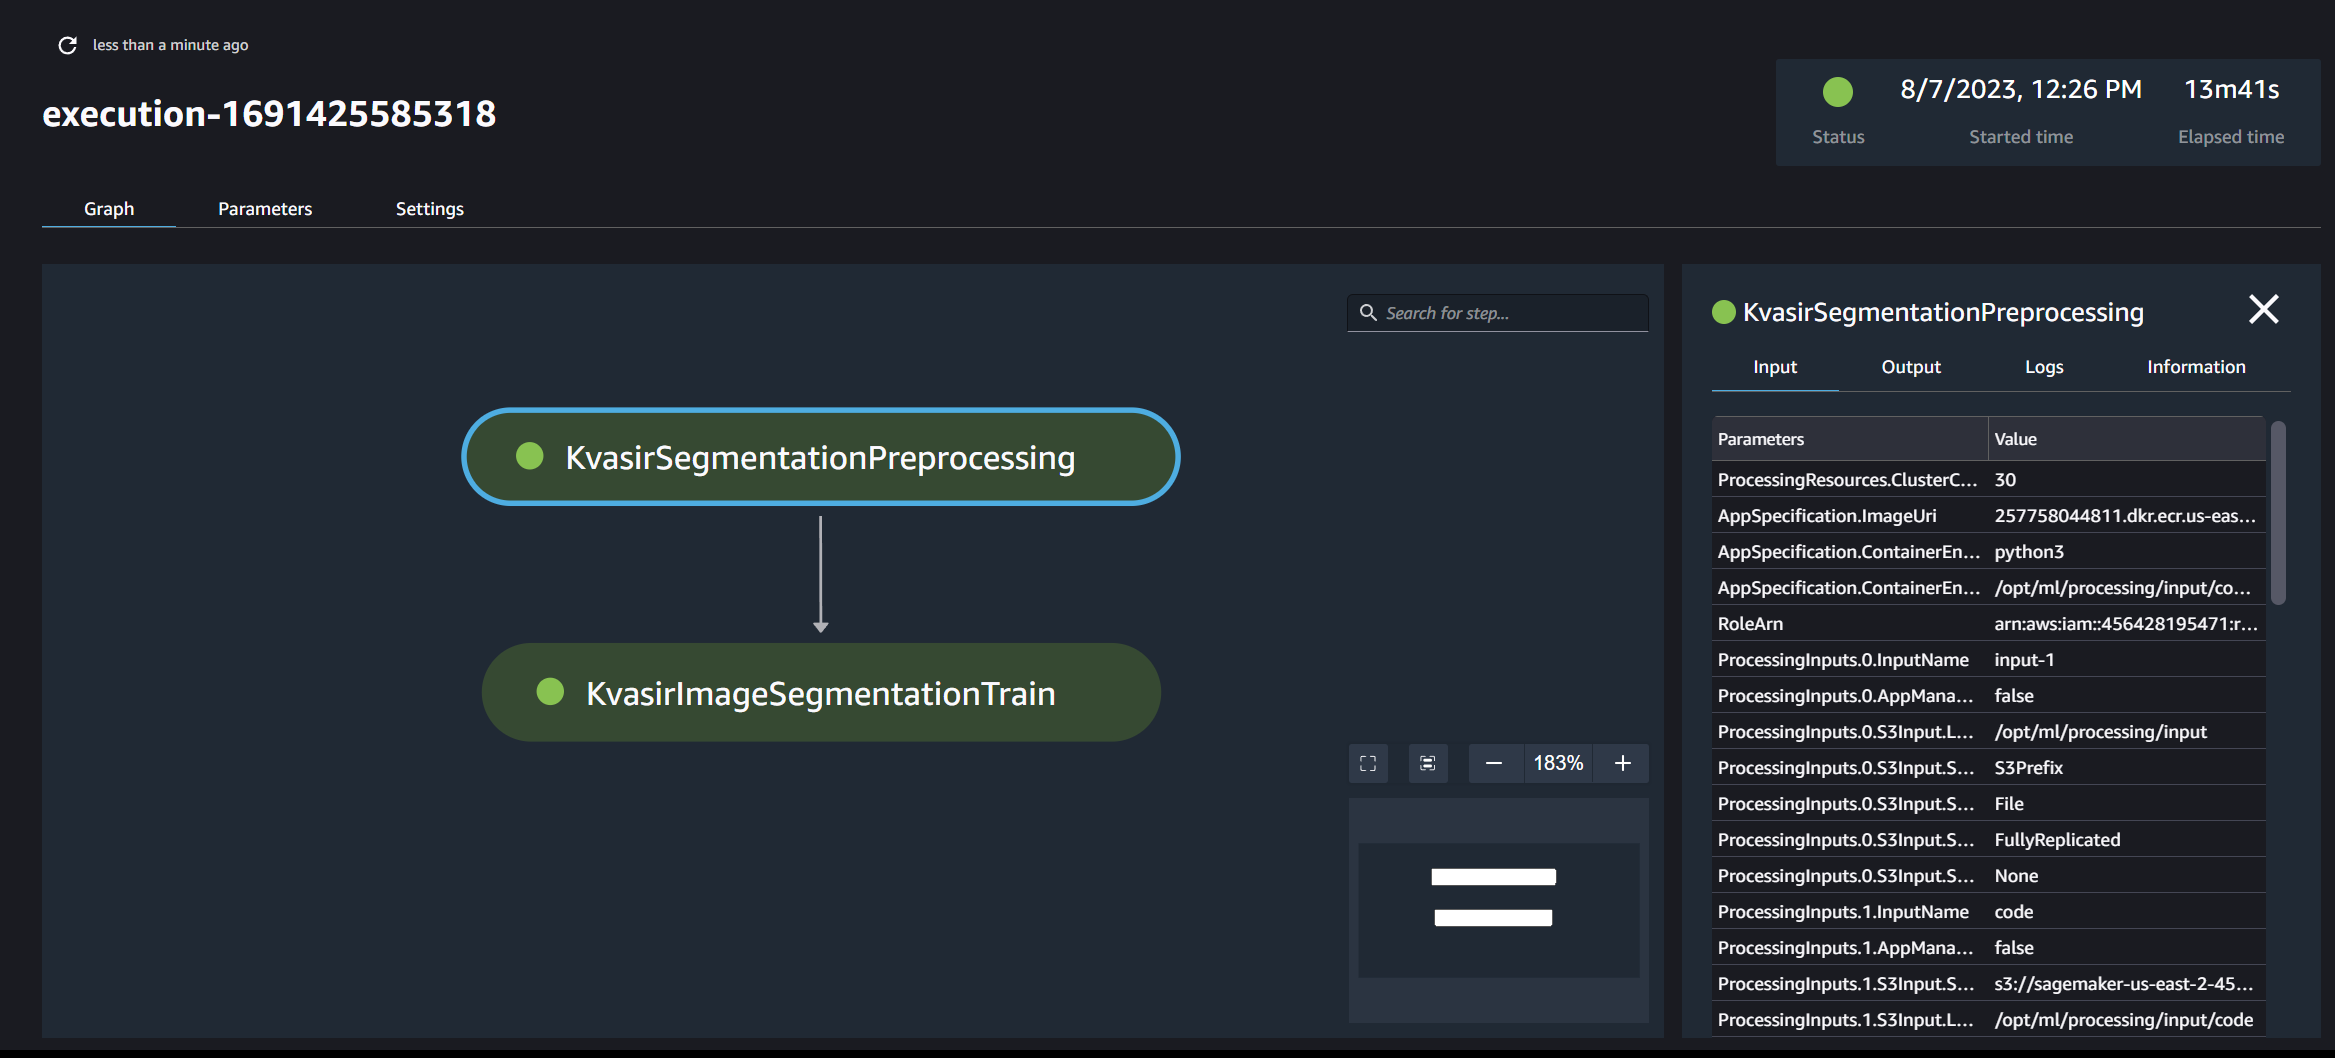
- The visual representation provides an overview of your pipeline's flow and the status of each step.
- To get detailed insights about each stage, simply select the respective node.
Provided everything went smoothly, you should see something like
How to register a Machine Learning Model with MLflow?
With our successfully executed pipeline, a model has been generated that, once evaluated, is ready for deployment. For deployment, the model must be registered within the MLflow framework.
In the train_tf.py file, we saw how to log the model. This does not register the model. We’ll have to do that manually.
Each run of the pipeline generates an experiment, which is logged in your DagsHub repository. DagsHub allows you to effectively compare various models and decide which one to deploy.
Registration is done on the MLFlow UI. To access it:
- Head to your DagsHub repository.
- Select the “Experiments” tab under the “remote” button.
- Click on the external link labeled “Go to MLflow UI”.
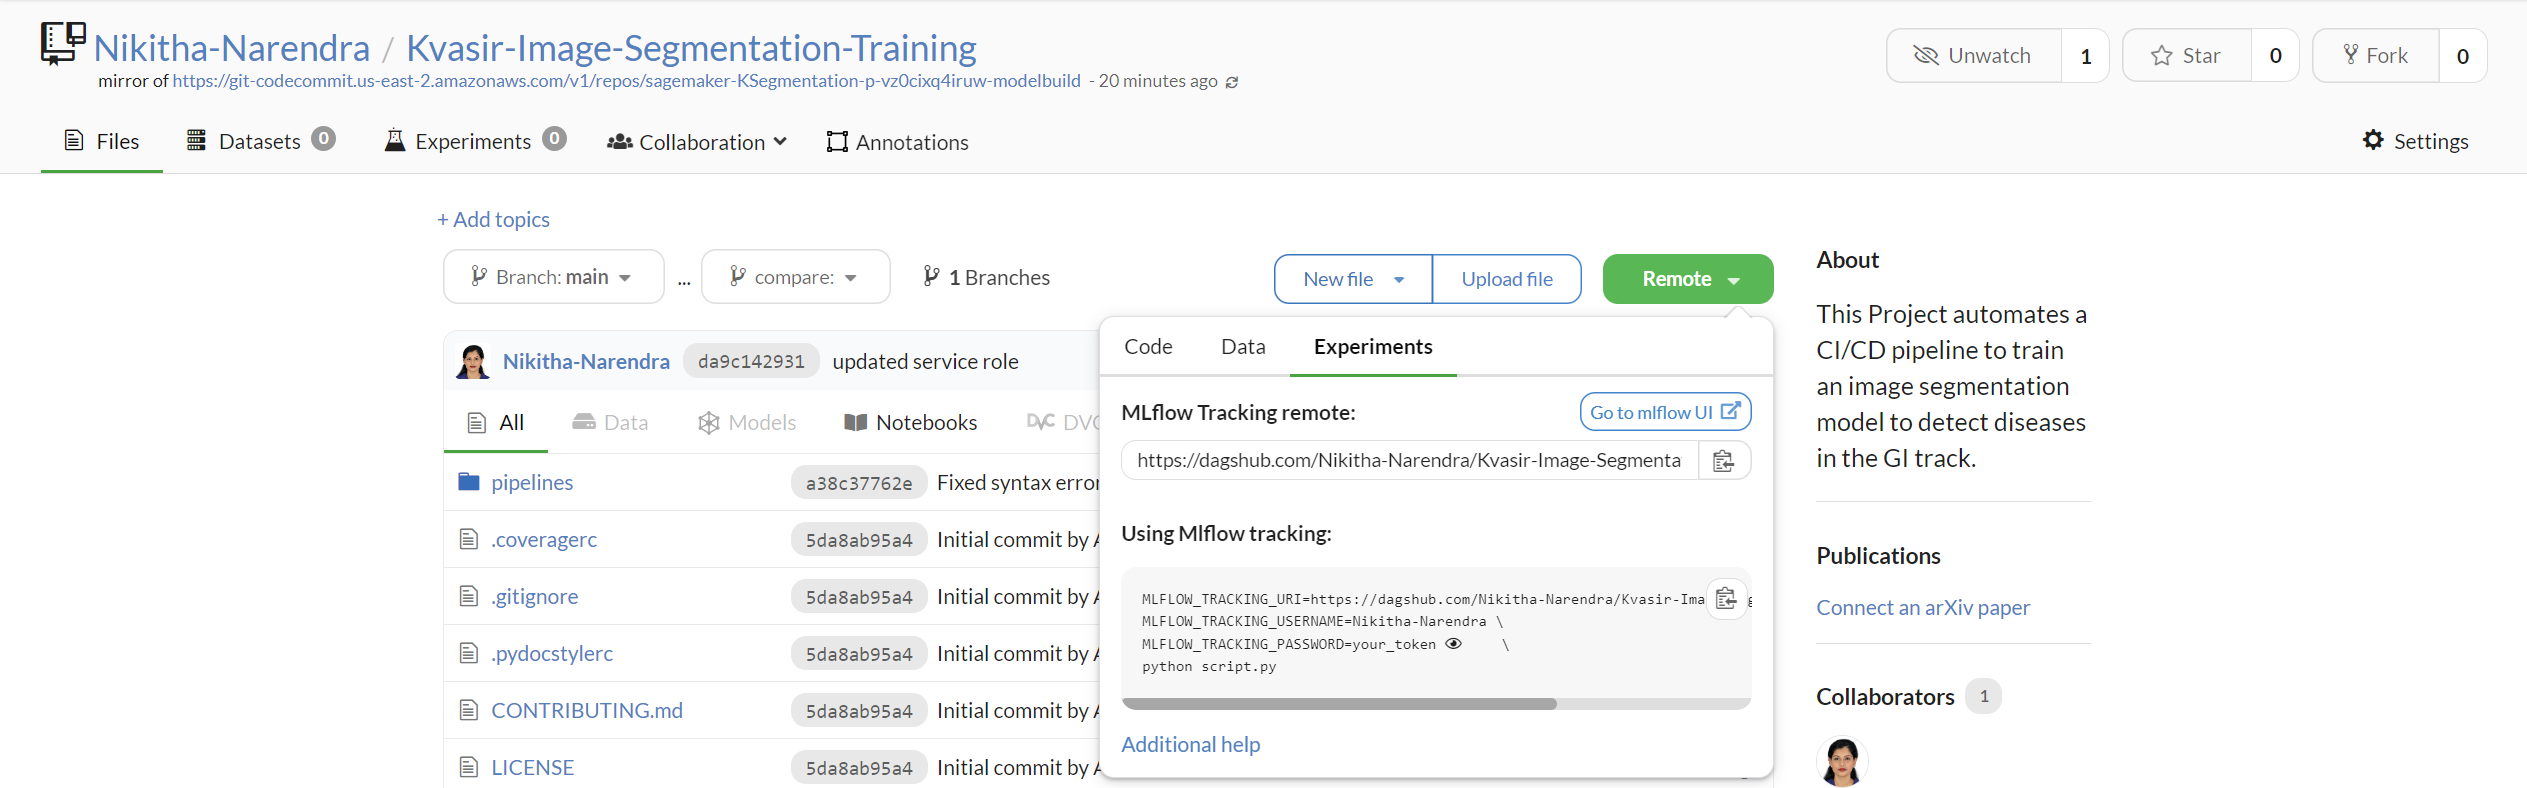
This will direct you to MLFlow's user interface, where you can see all the logged experiments.
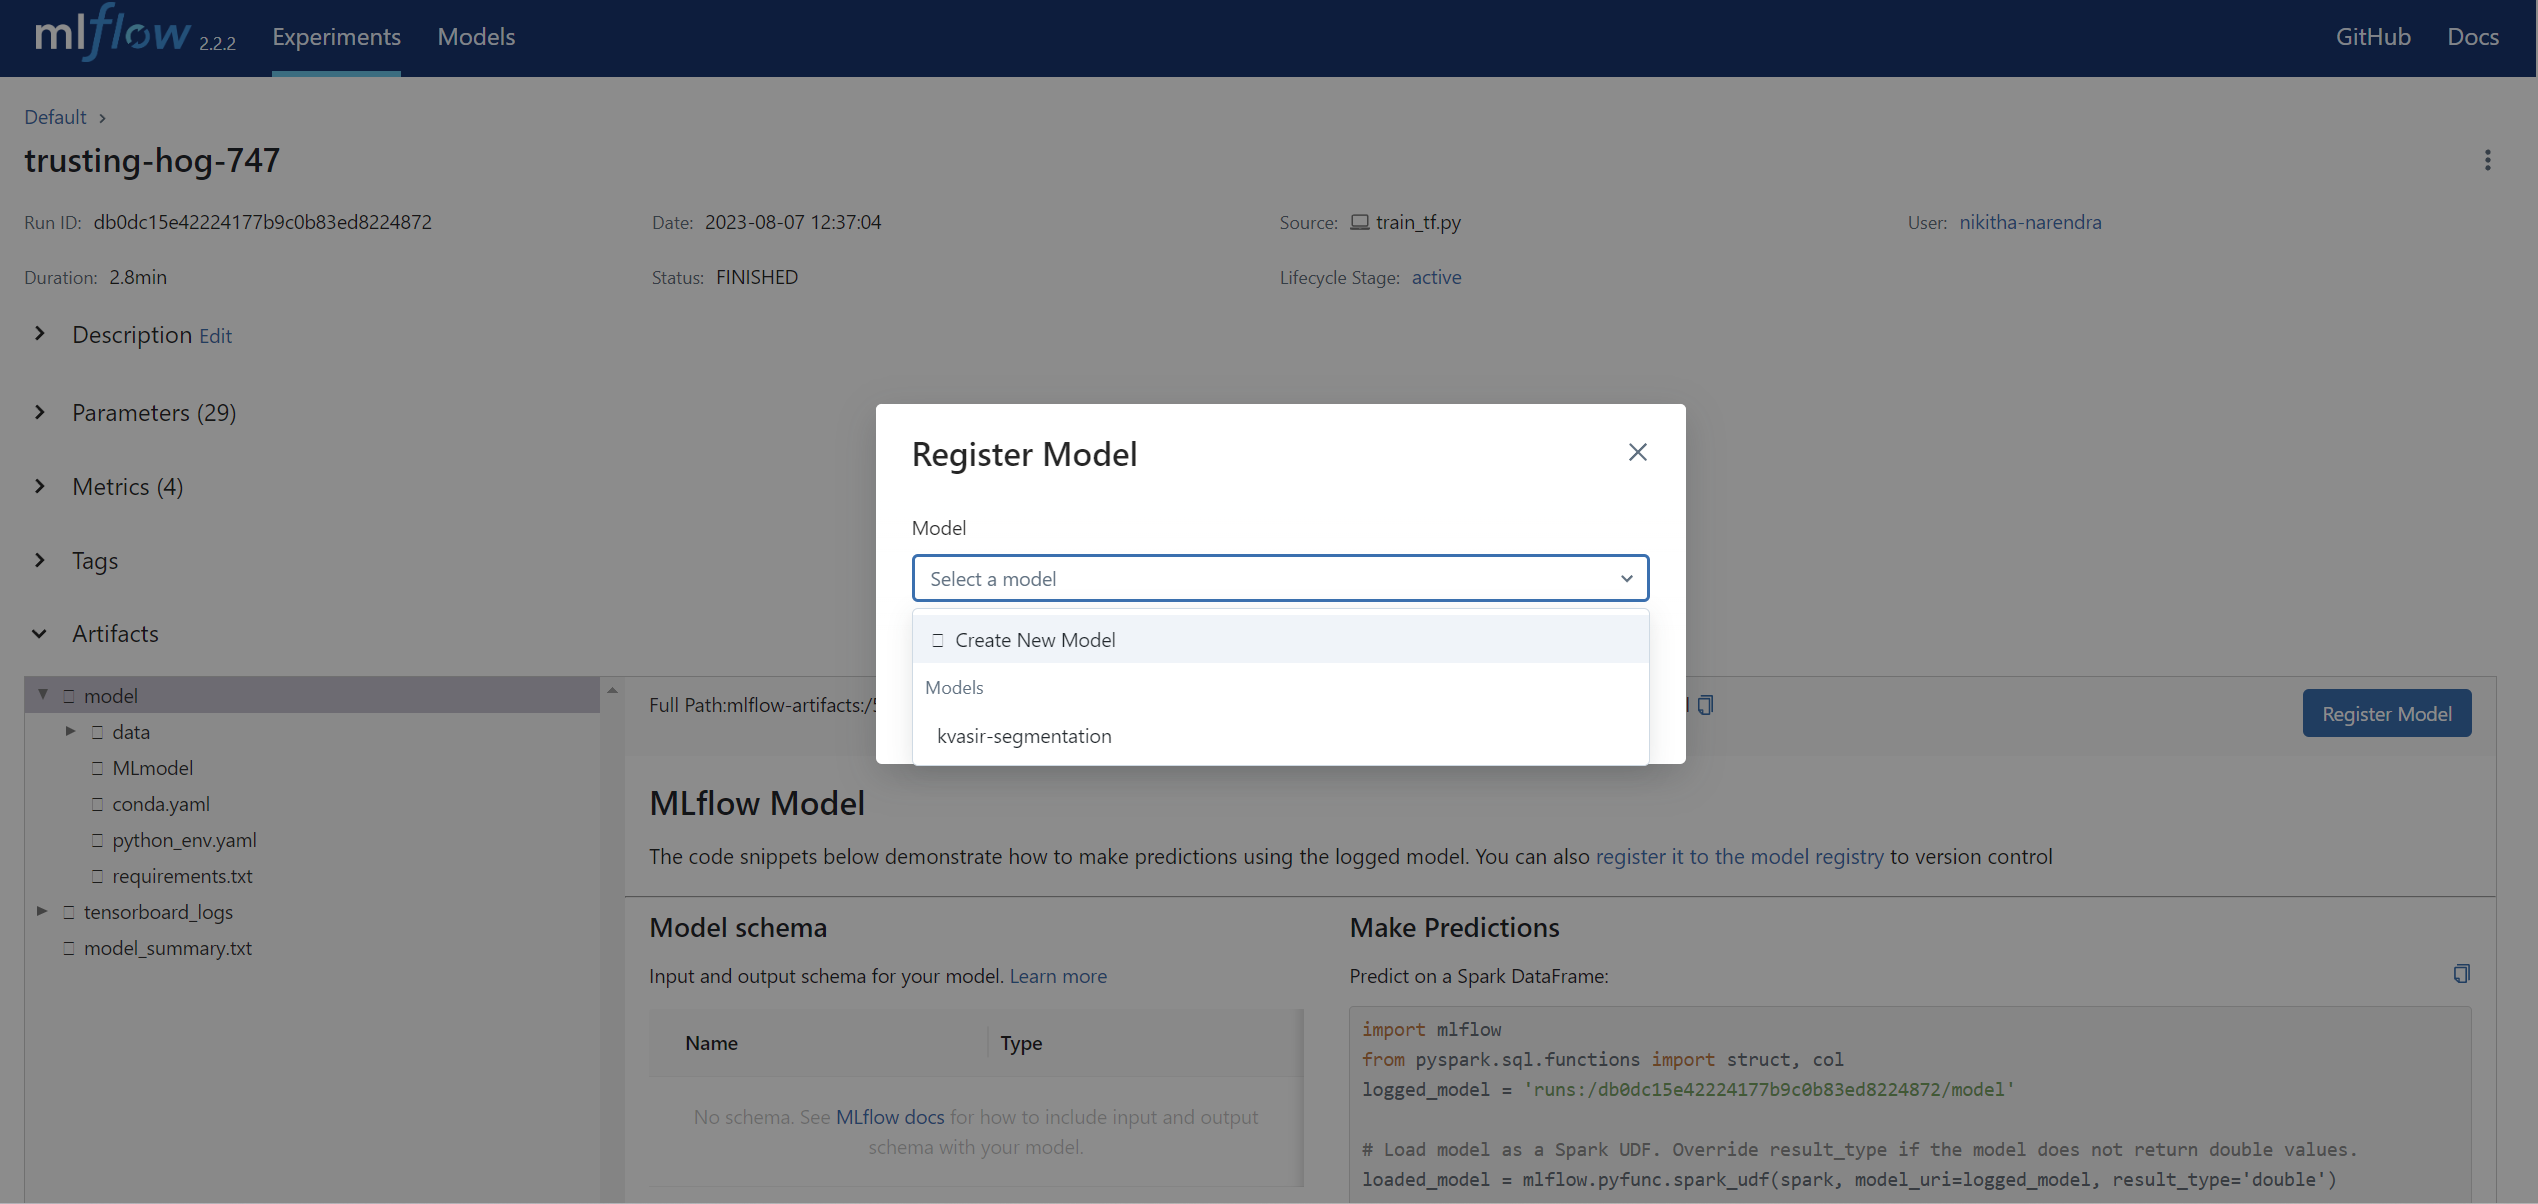
Select the model that performed well. Click the "Register Model" option and choose whether to register it as a new model or a new version. Upon successful registration, the model will appear in the "Models" tab.
Having completed the registration, you might wonder about the deployment process. It's a journey of its own. In the upcoming blog within this series, we will guide you through the automation of the deployment process.
Conclusion
Woohooo!!! In this (looong) post, you’ve learned about all the components of AWS and SageMaker that are needed to build a custom training pipeline. It may look daunting at first, but once you get the flow, you’ll see how simple it can be!
Additional improvements you could try:
- Different resources - Try out different computing resources that are more convenient for your use-case. Always remember to keep an eye on them though!
- Adding more Steps - Pipelines generally involve a large number of steps such as evaluation, testing, retraining, validation, etc. Try it out and let us know!
- Inference — Once you’ve registered the trained model to the MLflow Registry, the next step is to try deploying it! You can do this either through SageMaker or other means. More information on setting up an inference service can be found here and here.
This was a lot of information, but you pushed through! 🥳 You’ve learned how to set up SageMaker and train a model. All that remains is deployment. In the next blog, we’ll discuss how to create a CI/CD pipeline to deploy your model. Stay Tuned!
If you have any questions, feel free to reach out. You can join our Discord, where we’ve built a vibrant, helpful, and friendly community.


