Train a Text-to-Image Model Using Kubeflow
- Yono Mittlefehldt
- 9 min read
- 3 years ago
If you’ve been following along in our Kubeflow series, you should now know how to install Kubeflow locally and how to setup Kubeflow on AWS using Terraform. If you missed those, go check them out. This post will wait for you. Promise.
In this post, we’re going to look at training a model on a Kubeflow cluster! It’s probably what you’ve been waiting for, right?
How will the training architecture look like?
An overview of the architecture looks like this:
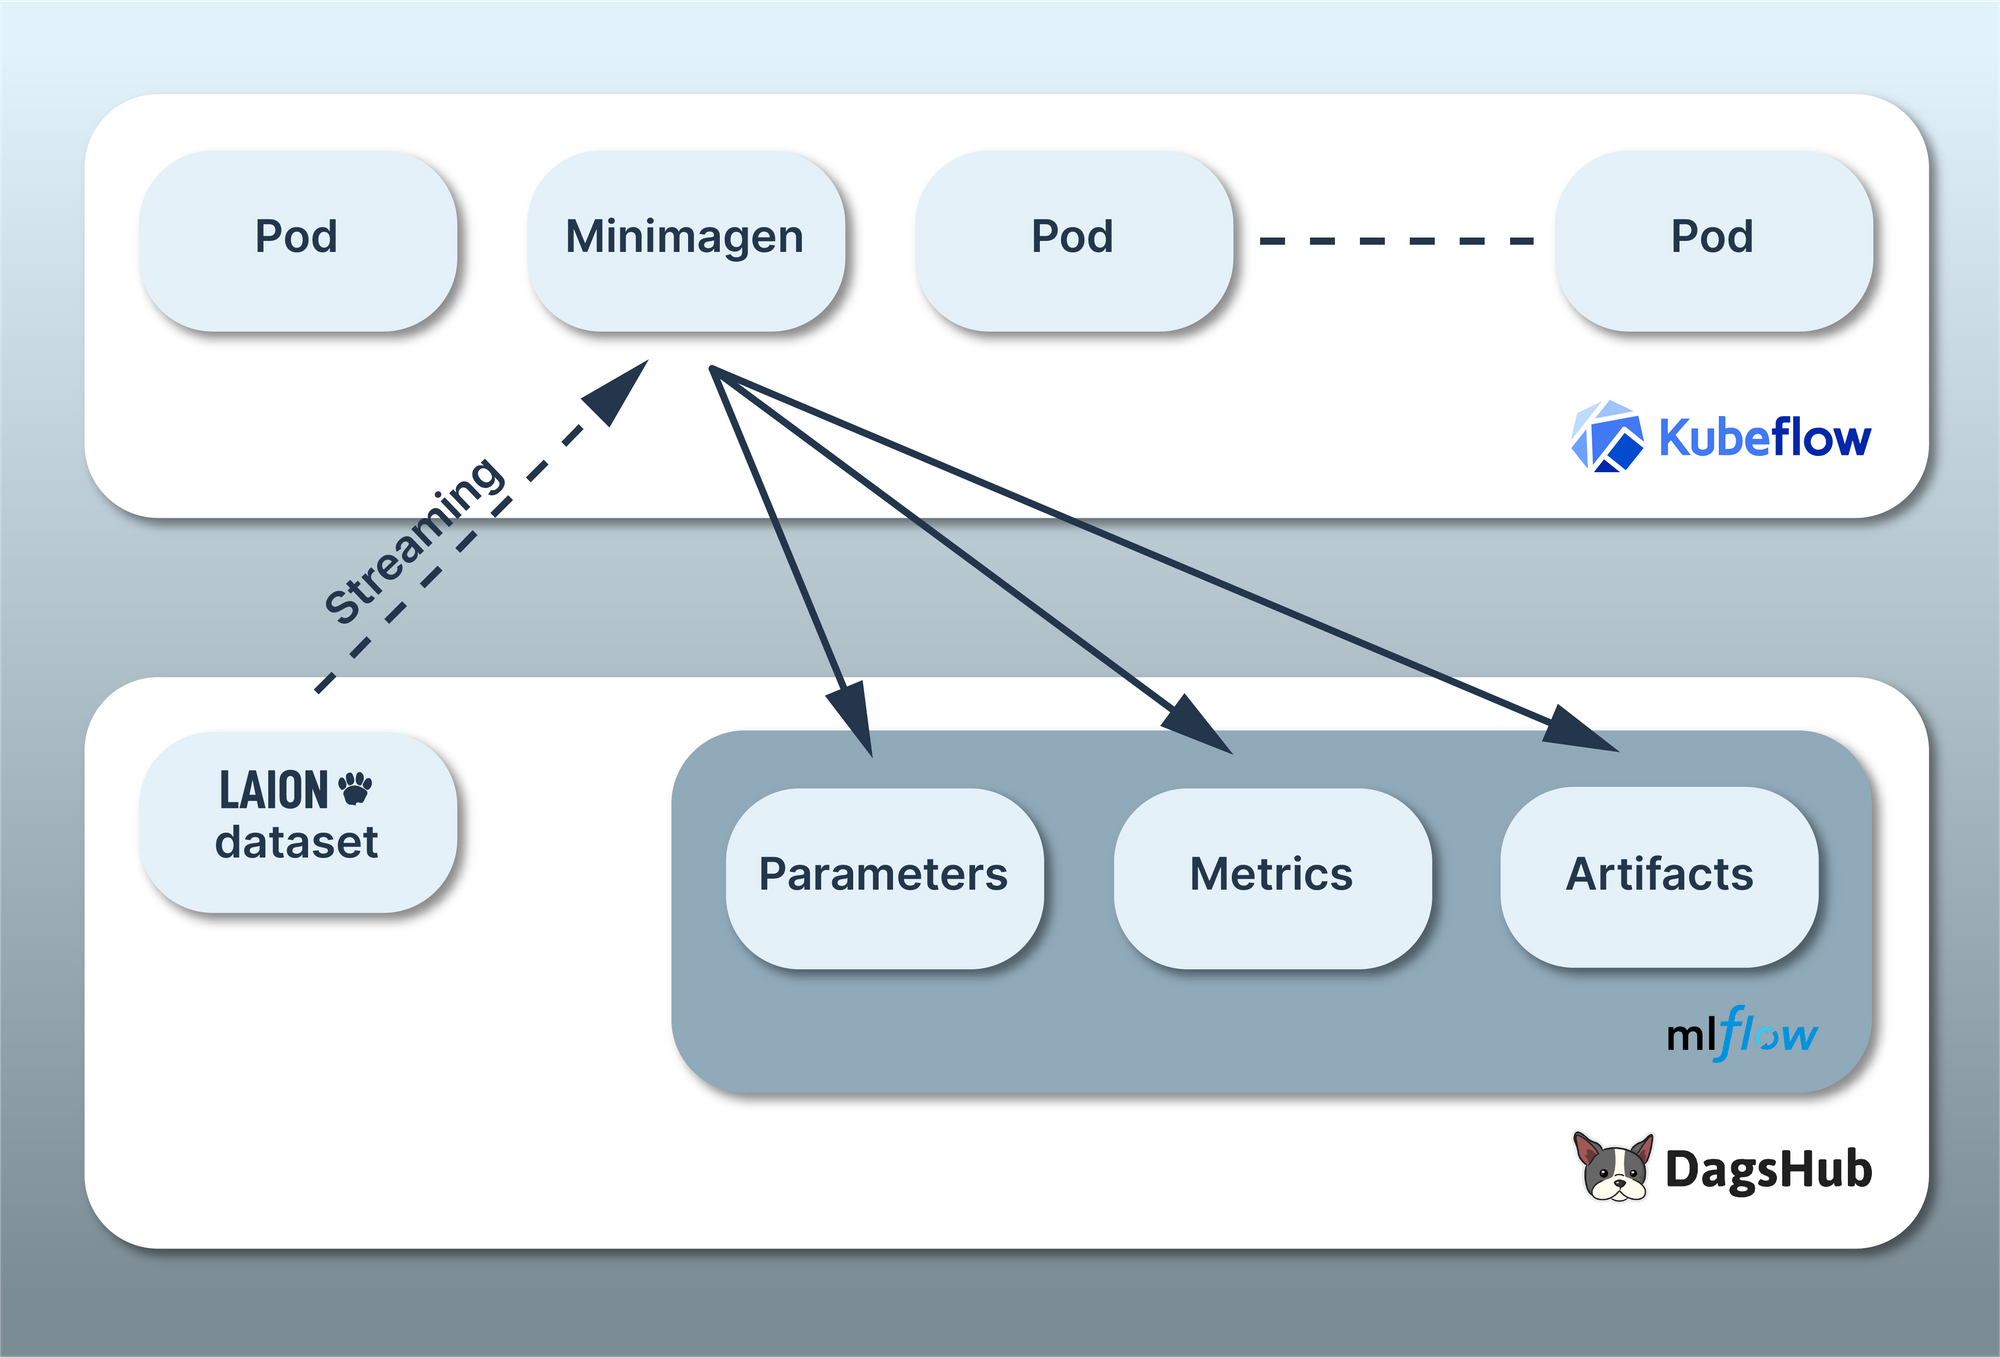
For this project, we’re going to be training a mini version of Google’s Imagen model, cleverly dubbed Minimagen. Furthermore, we’re going to use a subset of the LAION-Aesthetics V2 dataset, some of the same data used to train Stable Diffusion.
Since we’re training on a Kubeflow cluster, we have to think about how we get data into and out of the cluster. This is where some of the features and integrations we’ve added to DagsHub over the years come in.
We’ve downloaded the images from the LAION-Aesthetics V2 dataset, which have an aesthetics score of 6.5 or higher and put them into a public repository, anyone can access. This repo has 540k images and is over 87GB large! To avoid the upfront cost of downloading the entire dataset before we start, we can use DagsHub’s Direct Data Access (DDA) to stream the data from the repo to the Kubeflow cluster.
Additionally, we can log the parameters, metrics, and artifacts of the training run to MLflow.
All communication between our Kubeflow Pod and DagsHub will be handled automatically using the dagshub and mlflow Python libraries! Easy peasy, lemon squeezy.
Project Details
The heart of our training project is in this repo. It contains everything used to create a Docker image, which will be spun up in a Pod within our Kubeflow cluster. While you won’t need to do anything specifically, with this repo, it’s important to understand how everything fits together. This way, you’ll have a head start when implementing it in future projects.
train.py 🚂
Let’s start with the training script . If you take a look at the top of the file, you’ll see that some environment variables are required:
DAGSHUB_TOKEN = os.environ.get('DAGSHUB_TOKEN', None)
DAGSHUB_USER_NAME = os.environ.get('DAGSHUB_USER_NAME', None)
DAGSHUB_REPO_NAME = os.environ.get('DAGSHUB_REPO_NAME', None)

if DAGSHUB_TOKEN is None:
    raise EnvironmentError(
        "Environment variable 'DAGSHUB_TOKEN' must be set with valid token"
    )
if DAGSHUB_USER_NAME is None:
    raise EnvironmentError(
        "Environment variable 'DAGSHUB_USER_NAME' must be set"
    )
if DAGSHUB_REPO_NAME is None:
    raise EnvironmentError(
        "Environment variable 'DAGSHUB_REPO_NAME' must be set"
    )
This is so we can set up communication between your repo and the Pod running the training. Later we’ll show how to specify these environment variables.
Next, we set up the DagsHub Dataset repo, we’ll be streaming from:
import dagshub

# 1
dagshub.auth.add_app_token(DAGSHUB_TOKEN)

# 2
from dagshub.streaming import install_hooks
install_hooks(project_root='.',
              repo_url='https://dagshub.com/DagsHub-Datasets/LAION-Aesthetics-V2-6.5plus',
              branch='main')
Here we:
- Authenticate to DagsHub using the token we provided via the environment variable
- Set up DDA by installing some Python hooks based on the LAION dataset repo. These hooks detect calls to Python's built-in file operations. If the files exist in the DagsHub repo, it will load them on the fly as they're requested. Otherwise, it falls back to the local file system. Neat!
After that, we need to setup the connection to the MLflow server associated with our repo:
os.environ['MLFLOW_TRACKING_URI']=f"https://dagshub.com/{DAGSHUB_USER_NAME}/{DAGSHUB_REPO_NAME}.mlflow"

os.environ['MLFLOW_TRACKING_USERNAME'] = DAGSHUB_USER_NAME
os.environ['MLFLOW_TRACKING_PASSWORD'] = DAGSHUB_TOKEN

import mlflow
This allows us to use functions such as mlflow.log_params, mlflow.log_metrics, and mlflow.log_artifact to log things to MLflow. In fact, that’s exactly what the following code at the bottom of the training script does:
# 1
experiment_id = get_experiment_id('minimagen')
with mlflow.start_run(experiment_id=experiment_id):
		# 2
    mlflow.log_params(args.__dict__)

		# 3
    mlflow.log_params({
        "unet0_params": unets_params[0],
        "unet1_params": unets_params[1],
        "imagen_params": imagen_params
    })

		# 4
    mlflow.log_param("model_size_MB", model_size_MB)

		# 5
    mlflow.log_metrics({
        "unet0_avg_loss": avg_losses[0],
        "unet1_avg_loss": avg_losses[1],
    })

		# 6
    mlflow.log_artifact(dir_path)
After training is done, this code:
- Gets or creates a new MLflow experiment based on the name
'minimagen' - Logs the arguments used to run the training script
- Logs the parameters for the different pieces of the model
- Logs the size of the model in MBs, as calculated earlier in the script
- Logs the average loss of each of the two Unets
- And finally logs the output directory, which includes the trained model
The rest of the script is adapted from the original Minimagen repo. The only major difference is the use of a custom data loader, which was needed due to the format of the dataset.
Dockerfile 🚢
The Dockerfile is relatively short for this project:
# 1
FROM pytorch/pytorch:2.0.0-cuda11.7-cudnn8-runtime

# 2
WORKDIR /opt/workdir
COPY . /opt/workdir

# 3
RUN apt-get update; apt-get install -y --no-install-recommends \\
    g++ \\
    git

# 4
RUN pip install --no-cache-dir --upgrade -r /opt/workdir/requirements.txt

# 5
RUN pip install --no-cache-dir --upgrade torch torchvision

# 6
ENTRYPOINT ["python", "train.py", "--PARAMETERS", "./parameters"]
In summary, it:
- Start with a PyTorch image that includes CUDA support, so we can train using NVIDIA GPUs
- Copy the files from the repo to the working directory, that’s defined
- Install dependencies, which are required for at least one of the Python libraries we need to install
- Install the Python libraries necessary for the project
- Reinstall PyTorch and TorchVision, because one of the requirements in step #4 decided to unnecessarily downgrade our chose versions ಠ_ಠ
- Define the entry point for our Docker image, which is running our training script. Various model parameters are defined in the copied over parameters folder.
Speaking of Python requirements, checkout the requirements.txt to see what we need to directly install:
dagshub
minimagen
mlflow
pillow
We’ve gone over most of these already. minimagen is the original Minimagen repo. pillow is a powerful image processing library, often used with PyTorch and ML repos.
Testing locally
To build your own Docker image based on this repo, you could do so with the following command, run from the top level repo path:
docker build -t minimagen .
Once it’s finished building, you can test is with the following command:
docker run --rm --name minimagen-test \\
        --gpus all \\
        -e DAGSHUB_TOKEN=<token> \\
        -e DAGSHUB_USER_NAME=<username> \\
        -e DAGSHUB_REPO_NAME=<repo_to_write_to> \\
        minimagen:latest --BATCH_SIZE 2 --TIMESTEPS 25 --TESTING
Here we’re:
- setting the name for the running container to
minimagen-test - (optionally) enabling GPUs for training
- passing in the three environment variables we mentioned the train.py script needs
- specifying we want to spin up the Docker image tagged as
minimagen:latest - and passing additional arguments to our training script
Everything after the Docker image tag is appended to what’s specified in the ENTRYPOINT section of the Dockerfile. So in this case, the command the Docker container runs when it spins up would look like this:
python train.py --PARAMETERS ./parameters \\
                --BATCH_SIZE 2 \\
                --TIMESTEPS 25 \\
                --TESTING
When everything is working properly, your output should look something like this:
2023-05-17 13:11:31.310 - INFO     Training size: 8
2023-05-17 13:11:31.310 - INFO     Validation size: 8
0it [00:00, ?it/s]
-------------------- EPOCH 1 --------------------

----------Training...----------
Downloading: 100%|██████████| 773k/773k [00:00<00:00, 1.96MB/s]
Downloading: 100%|██████████| 2.27k/2.27k [00:00<00:00, 2.03MB/s]
Downloading: 100%|██████████| 1.18k/1.18k [00:00<00:00, 1.47MB/s]
Downloading: 100%|██████████| 231M/231M [00:02<00:00, 101MB/s]
Some weights of the model checkpoint at t5-small were not used when ...
- This IS expected if you are initializing T5EncoderModel from the ...
- This IS NOT expected if you are initializing T5EncoderModel from ...
Some weights of T5EncoderModel were not initialized from the model ...
You should probably TRAIN this model on a down-stream task to be able ...

----------Validation...----------t/s]
100%|██████████| 4/4 [00:04<00:00,  1.15s/it]
4it [00:17,  4.46s/it]00:04<00:00,  1.18s/it]
0it [00:00, ?it/s]Unet 0 avg validation loss:  tensor(1.0752, device='cuda:0')
Unet 1 avg validation loss:  tensor(1.0622, device='cuda:0')

-------------------- EPOCH 2 --------------------

----------Training...----------

----------Validation...----------
100%|██████████| 4/4 [00:00<00:00, 18.77it/s]
4it [00:00,  5.72it/s]00:00<00:00, 21.44it/s]
Unet 0 avg validation loss:  tensor(1.0575, device='cuda:0')
Unet 1 avg validation loss:  tensor(1.0436, device='cuda:0')
100%|██████████| 4/4 [00:00<00:00, 17.79it/s]
How do I train a model on a Kubeflow cluster?
Now comes the fun part! We’re going to assume that you have a Kubeflow cluster running somewhere. If you need to get one set up on AWS, check out our previous post.
Since Kubeflow builds on top of Kubernetes, can you guess what you need to deploy our training image? That’s right! YAML!
From a machine, where you control your Kubeflow cluster, create a new YAML file and call it minimagen.yaml. Add this to the file:
apiVersion: "kubeflow.org/v1"
kind: PyTorchJob
metadata:
  name: minimagen-train
  namespace: kubeflow
spec:
  pytorchReplicaSpecs:
    Master:
      replicas: 1
      restartPolicy: OnFailure
      template:
        spec:
          containers:
            - name: pytorch
              image: public.ecr.aws/j0t5n4n3/dagshub/minimagen-train
              imagePullPolicy: Always
              args: ["--BATCH_SIZE", "2", "--TIMESTEPS", "25", "--TESTING"]
              env:
                - name: DAGSHUB_TOKEN
                  value: "<token>"
                - name: DAGSHUB_USER_NAME
                  value: "<username>"
                - name: DAGSHUB_REPO_NAME
                  value: "<repo_to_write_to>"
              resources:
                  limits:
                      nvidia.com/gpu: 1
The important parts to note here are:
kindis set toPyTorchJob.PyTorchJobis a Kubernetes custom resource to run PyTorch training jobs on Kubernetes.- we use the
Masterlabel underpytorchReplicaSpecs, since we’re not doing distributed training. If you are doing distributed training, you would also have aWorkerlabel underpytorchReplicaSpecs. argsare where we pass additional arguments that appended to our Docker image’sENTRYPOINTenvis where we specify the environment variables we needresourcesis where we tell Kubeflow that this Docker container needs a GPU to run on
Once you have the YAML file ready, you can start training on your Kubeflow cluster using the following command:
kubectl apply -f minimagen.yaml
This will schedule a new pod to run your Docker container on using parameters specified in the YAML file.
To make sure everything is working, run:
kubectl get pods -n kubeflow | grep minimagen
You should see something like this:
minimagen-train-master-0 2/2 Running 0 3h36m
How do I delete the training pod?
If for whatever reason you need to stop the pod, you can do so by running:
kubectl delete -f minimagen.yaml
Where can we go from here?
This post, along with the previous ones, have shown you the basics for spinning up a Kubeflow cluster and starting training on a single GPU node. However, the real power of using Kubeflow comes when you need to perform distributed training across multiple nodes. Take a look at this example YAML for how to get started with distributed training.
Additional improvements you could make include:
- Increase size of Minimagen — As a starting point, look at the
./parametersfolder for JSON files to change the internal parameters of the internal Minimagen models - Register model to MLflow — Create an
mlflow.PyFuncwrapper around the trained Minimagen model and register it to the MLflow Model Registry. This will allow you to easily deploy the model. For a reference on how to do that, check out our MLflow Crash Course on the Model Registry. - Inference — Once you’ve registered the trained model to the MLflow Registry, then the next step is to try deploying it! You can do this either through Kubeflow or other means. More information on setting up an inference service can be found here and here.
- Log realtime training metrics to Mlflow — Currently, the training metrics are only logged at the end of training. It could be more interesting (and useful!) to be able to see how the training metrics evolve during the training run.
Each of these improvements is an open issue on the repo. PRs are welcome! If you’d like help or advice on how to get started, feel free to ask 🙂
Congratulations! Through this series of posts, you’ve learned a lot about setting up Kubeflow and using it to train a model. You deserve a high five!

There’s so much more to Kubeflow for you to discover. Check out how you can use notebooks and setup pipelines for starters!
If you have any questions, feel free to reach out. You can join our Discord, where we’ve built a vibrant, helpful and friendly community.


