Faster Machine Learning Versioning and Tracking: Example using FDS
- Nir Barazida
- 6 min read
- 5 years ago
MLOps Team Lead @ DagsHub

FDS, Fast Data Science, is an open-source tool that makes version control for machine learning fast & easy. It combines Git and DVC under one roof, and takes care of code, data, and model versioning.
FDS will help you:
- Avoid mistakes, by recommending where each file should be tracked, using a smart version control wizard 🧙♂️.
- Automate repetitive tasks, by unifying commands (e.g.
git status+dvc status=fds status) - Make version control faster, easier to use, and more friendly, by providing a human centric UX – want to save a new version and push it to your shared remote, just
fds saveand you're good to go.
This blog is a step-by-step guide on how to version your machine learning project using FDS. We'll Track the “Pneumonia-Detection” project, in which we train a TensorFlow model to classify between sick and healthy chest X-ray images. The data set used in this project was taken from the “Chest X-Ray Images (Pneumonia)” Kaggle competition. By following the steps detailed below, you will gain hands-on experience using FDS.

In this blog, we will cover how to perform the following actions using FDS:
- Initialize and configure Git and DVC in our local machine.
- Track the project files using both Git and DVC with a single command.
- Push the files to Git and DVC remotes.
- Automatically version, track, commit, and push all project files to the remote with a single command
Project setup
We will start by creating a new directory from the terminal named “Pneumonia-Detection” and move into it. Then, we will create a virtual environment, add it to the .gitignore file, activate it, and install FDS by running pip install fastds.
Note: Because DVC can also be installed with brew, we didn’t add it as a dependency package to FDS. However, if FDS recognizes that DVC is not installed in the virtual environment, it will suggest installing DVC for you.
Mac & Linux
$ mkdir Pneumonia-Detection && cd Pneumonia-Detection
$ python -m .venv venv
$ echo .venv/ >> .gitignore
$ source .venv/bin/activate

$ pip install fastds
Windows
$ mkdir Pneumonia-Detection && cd Pneumonia-Detection
$ py -m venv .venv
$ echo .venv/ >> .gitignore
$ .venv/Scripts/activate.bat

$ pip install fastds
Next, we will initialize Git and DVC. Instead of using the two tools for this task, we can use the fds init command that initializes them both.
Let’s open a repository on DAGsHub and name it “Pneumonia-Detection”.
Next, we will configure the repository’s Git and DVC remotes with our local directory by running the following command:
$ git remote add origin https://dagshub.com/<DAGsHub user-name>/Pneumonia-Detection.git
$ dvc remote add origin https://dagshub.com/<DAGsHub user-name>/Pneumonia-Detection.dvc
$ dvc remote modify origin --local auth basic
$ dvc remote modify origin --local user <DAGsHub user-name>
$ dvc remote modify origin --local password <your token>
Adding the project files
We are ready to add files to our local directory. For this task, we will use the dvc get command to download the files from DAGsHub. Please note that this command is required only for the sake of the tutorial. I choose to use it, so you will have access to the files to follow the tutorial.
Note: The original data set is very big. We will use a smaller version of the data set to reduce the downloading, versioning, and uploading time. If you want to use the full data set, skip the first command and download it directly from the Kaggle competition and unzip it under Pneumonia-Detection/data/raw-data.
$ dvc get https://dagshub.com/nirbarazida/Pneumonia-Detection-FDS-Demo data/raw-data -o data/raw-data
$ dvc get https://dagshub.com/nirbarazida/Pneumonia-Detection-FDS-Demo eval
$ dvc get https://dagshub.com/nirbarazida/Pneumonia-Detection-FDS-Demo model/ -o model/
$ dvc get https://dagshub.com/nirbarazida/Pneumonia-Detection-FDS-Demo src
Now, the project holds the following directories:
data/- Holds the raw data images split into three subdirectories: train, val (validation), and test.eval/- Holds information about the model and its performance.model/- Holds a pretreated model with the best performances.src/- holds the project's code files, including Python modules and Jupiter notebooks.
.
├── data
│   └── raw-data
│       ├── test
│       │   ├── NORMAL
│       │   └── PNEUMONIA
│       ├── train
│       │   ├── NORMAL
│       │   └── PNEUMONIA
│       └── val
│           ├── NORMAL
│           └── PNEUMONIA
├── eval
│   ├── metrics
│   ├── params
│   ├── predictions
│   └── processed_data
├── model
│   └── variables
└── src
    ├── const
    ├── notebooks
    └── utiles

22 directories
Tracking files with Git + DVC = FDS
At this point, we want to track the files in the project with Git and DVC. This task requires the following steps:
- Choose and track the large files/directories with DVC.
- Use Git to track the pointer/pipeline files using Git.
- Track the rest of the project's files with Git.
When using Git and DVC to version the project, we perform these actions frequently. This repetitive work can be a hassle and, for some users, not intuitive. This is exactly why we created the fds add WIZARD!

Because we want to version all the project files, we will run fds add ..
All of the project's files are versioned and ready to be pushed! But wait, before we run the push command, we need to commit the files first. The fds commit command encapsulates dvc commit and git commit into one. It commits changes to DVC first, adds the pointer files with the updated hashes to Git, then immediately commits these changes (plus any other staged changes) to a new git commit. In our case, FDS will recognize that nothing was changed in the DVC tracked files; therefore, it will effectively only commit Git-tracked files, which is what we'd expect.
$ fds commit “Track all the project files with FDS”At this point, we want to make sure that all the files are committed. To do that, we will run the fds status command that checks the status of both Git and DVC tracked files.
Ladies and gentlemen, please fasten your seatbelts…It's officially PUSH time!
To push our files, we will use the fds push command that...you guessed it - pushes the files tracked by both Git and DVC! Let's check the new status of the repository on DAGsHub.
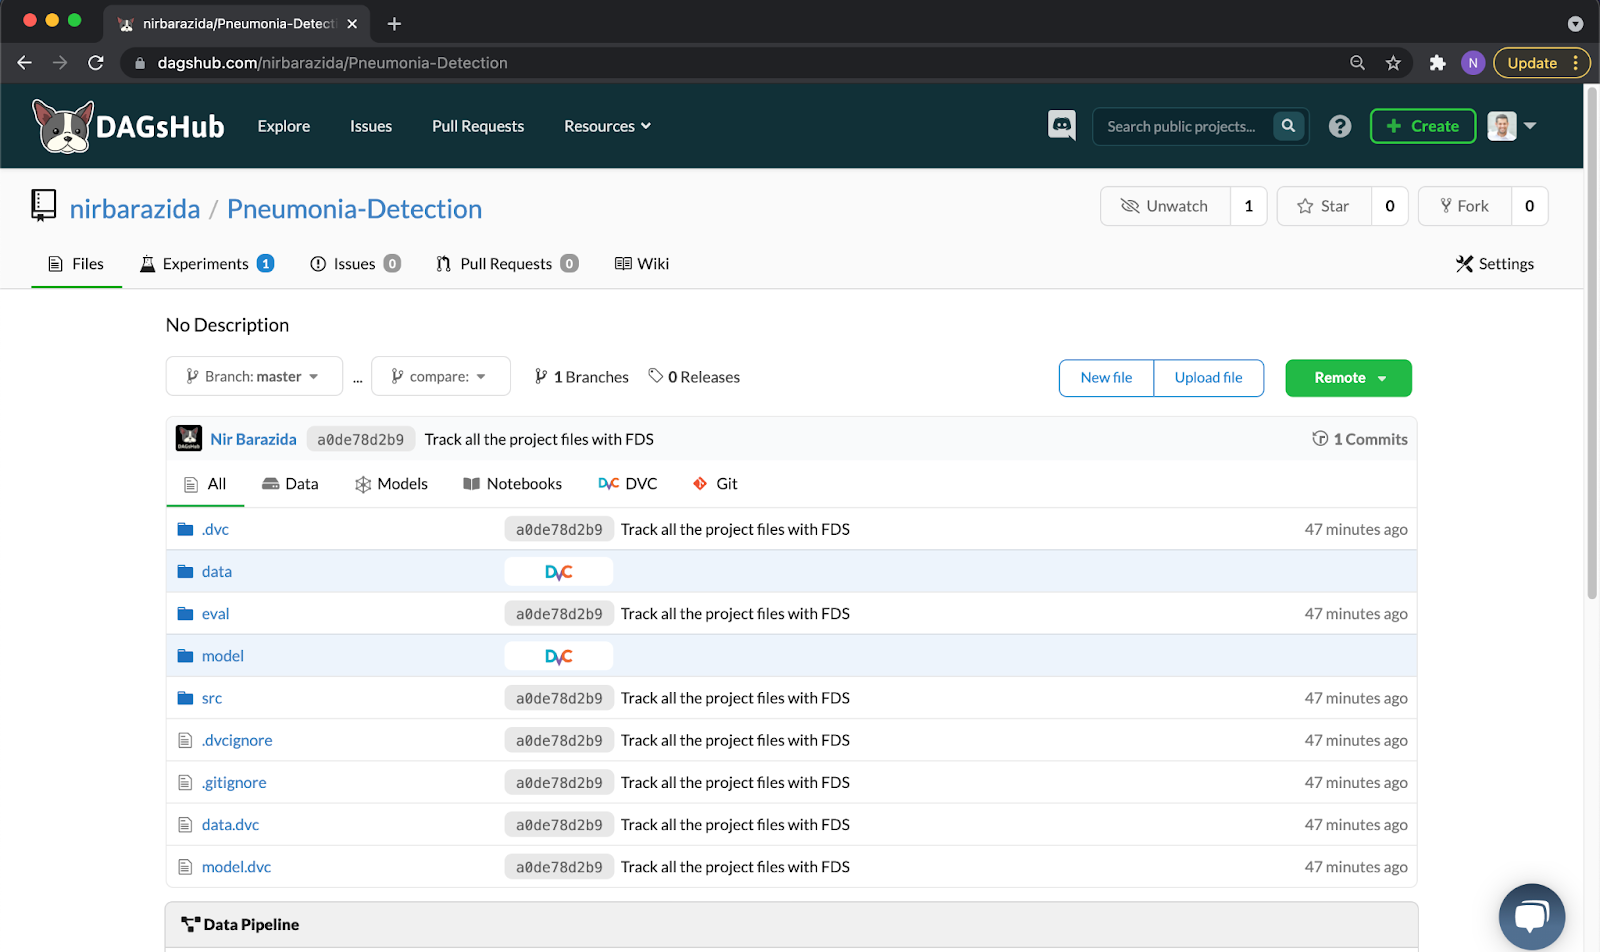
As we can see, all the files tracked by Git and DVC were pushed to the remotes. Not only that, we can see all of the project's components in one place, including code, data, models, and pipeline.
Shortening the process to 1 command

If you're not familiar with Git, DVC, or FDS and don't feel comfortable using those commands or just want to make your life easier, the fds save command is for you! By running this command, FDS will version, track, commit, and push all project files using Git and DVC to your remote. To showcase the usage of this command, we will download a processed data directory and run the fds save command.
$ dvc get https://dagshub.com/nirbarazida/Pneumonia-Classification data/processed -o data/processed --rev 88b9f33
$ fds save “Add processed data directory”
Let's check the new status of the repository on DAGsHub.
As we can see, the processed data directory was tracked by DVC, the updated data.dvc pointer file was tracked by Git, and both were successfully pushed to DAGsHub.
Summary
We reached the end of this tutorial, but our journey together has only begun.

FDS is completely Open-Source!
Although our developers constantly improve FDS's capabilities, we welcome you to contribute to FDS and receive everlasting glory. You can participate by:
- Creating a pull request with a bug fix or a new enhancement,
- Using FDS and letting us know of any issue or improvements we can make – by creating an issue or sharing it on our Discord channel
- Starring the repo and sharing it with your colleagues and friends.